Routes
The routes feature enables you to schedule a route for an entity, specifying multiple checkpoints or locations for the driver to visit, along with optional times for each checkpoint. While creating a route, you have the option to include time and duration fields for each checkpoint. Although these fields are optional, they provide valuable information for generating Route reports.
Creating a Route
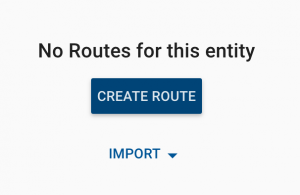
To create a route:
- Access the Tracking application by clicking on any entity to navigate to the Dashboard.
- From the Trip Information card, locate and click on the "ROUTES" option.
- Next, click on the "CREATE ROUTE" button to begin the route creation process.

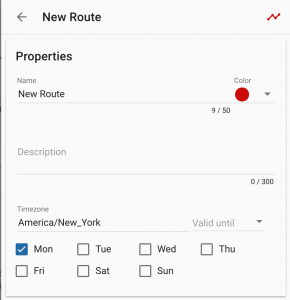
Routes possess the following properties:
- Name: Specifies the name of the route.
- Color: Determines the color of the path associated with the route.
- Description: Provides a text description of the route.
- Timezone: Specifies the time zone for the checkpoints' time.
- Valid until: Defines the date until which the route will repeat weekly on the specified days of the week.
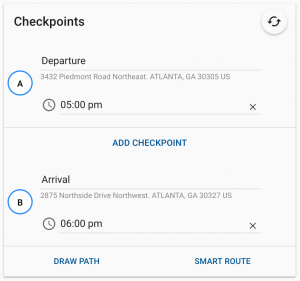
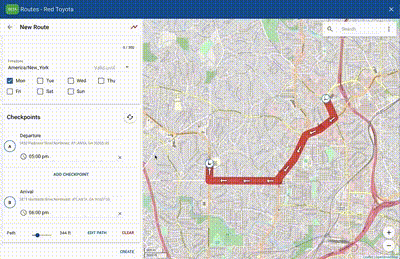
After clicking on "CREATE ROUTE," the initial step is to set the Departure and Arrival points by clicking anywhere on the map to designate each point.
Once the Departure and Arrival points are set, you can scroll down to draw a path manually or create a SMART ROUTE. The SMART ROUTE option automatically generates the most efficient path between the Departure and Arrival points.
The Departure and Arrival points serve as default checkpoints, but you have the flexibility to change their names and scheduled times. Additionally, there is a 5-minute grace period within the application from the scheduled time, during which the entity will be considered "on time."
Adding Checkpoints
The following gif shows how to add checkpoints to Routes.
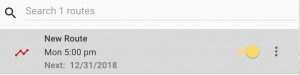
Once you have created a route, you can see when it’s scheduled next from the routes list.
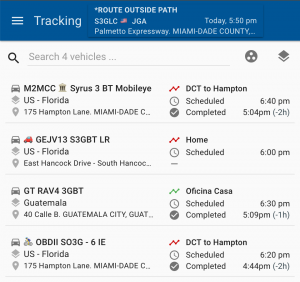
From the tracking entity list, you can switch views to see when a route is scheduled for multiple entities.
Importing Routes
To import routes, you have two options:
-
Import from another entity: Click on the "+" button at the bottom right of the routes list, then click on the file icon. Select the entity from which you want to import the route, and then choose the specific route to import.
-
Import from a file: Go to the import section and click on the cloud upload icon. Supported file types include KML and GPX. You can select the file containing the route you want to import. Examples of supported files are Example KML and Example GPX.
Monitoring Routes
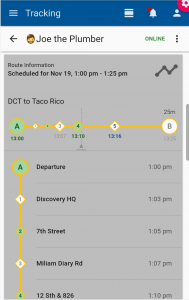
- Single Entities: route monitoring can be conducted in real-time through the tracking dashboard. When an entity is currently on a route, the trips card will automatically convert to a Routes card, providing real-time monitoring of the route's progress.\
Routes will appear in the tracking dashboard up to 2 hours before their scheduled start time and up to 4 hours after they are completed, unless another pending route is scheduled to start before then.
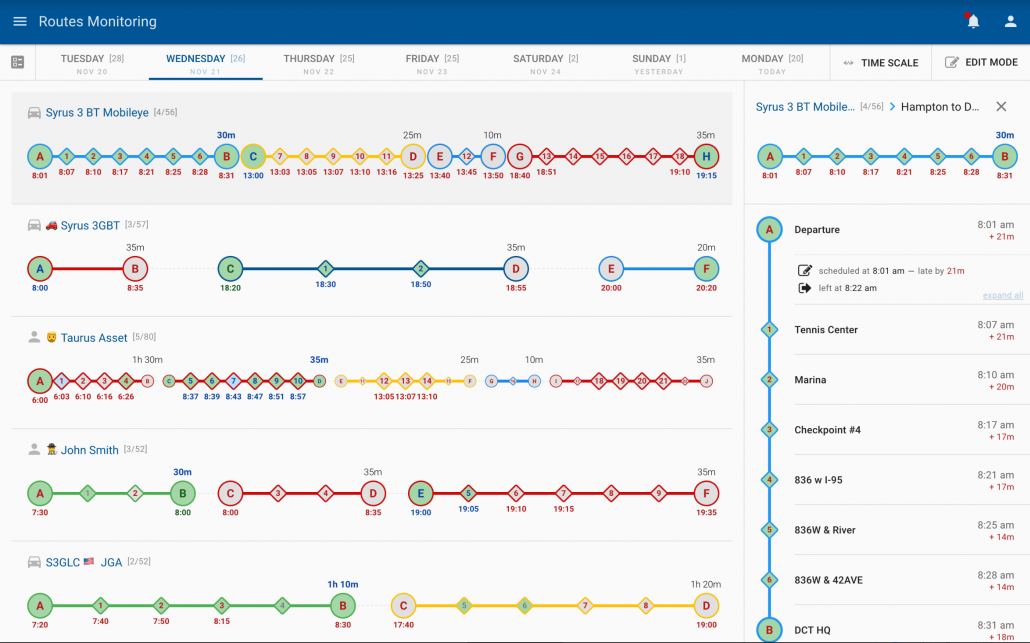
- Multiple Entities: For monitoring and viewing the history of multiple entities, you can utilize the Routes Monitoring app in the main menu.
- Start by selecting the entity that has the route assigned.
- Click the blue "GET" button along the bottom to retrieve the route information.
- The days of the week are displayed as tabs along the top. Click on each tab to view the history of route completion for that particular day.
- On the map display, the departure and arrival points are represented by circles with letters. Checkpoints along the route are denoted by diamonds with numbers.
This interface allows you to easily track the progress of multiple entities on their assigned routes and review historical completion data for each day of the week.
- Color Scheme
- Background shaded colors for checkpoints indicate different statuses:
- White: Checkpoint has not been visited.
- Gray: Violation of the visit (the entity did not stop there).
- Blue: Violation of the duration (entity left too early or stayed too long).
- Red: Violation of duration & arrived late (entity arrived late and also either stayed too long or too little).
- Green: Entity reached the checkpoint at the correct time.
- Font colors for checkpoints indicate different statuses:
- None: No time displayed underneath the checkpoint, indicating there was no scheduled time of arrival.
- Black: Scheduled arrival time.
- Red: Checkpoint not visited at the scheduled time.
- Green: Checkpoint visited at the correct time (within +/- 5 minutes of the scheduled time).
- Blue: Checkpoint was visited ahead of time.
- Background shaded colors for checkpoints indicate different statuses:
Route Alerts
In the automation module, you can create alerts using various conditions from Routes. Here are the available alerts:
-
Starts/finishes route: Triggered when the entity starts or finishes a route. Fires one time.
-
Exits checkpoint/path: Triggered when the entity leaves a checkpoint or exits the path. Fires one time.
-
Is inside/outside route path: Triggered when the entity is inside or outside the path. This alert is permanent while the condition exists.
-
Does not start/finish route: Equivalent to the entity starting the route late or not finishing on time. Fires one time.
-
Does not visit a checkpoint: Triggered when the entity misses a checkpoint (excluding optional checkpoints).
-
Violates checkpoint duration: Triggered when the entity overstays or leaves early based on the duration set for the checkpoint.

Route Alert Sample Messages: Use the following as sample messages for alerts related to routes.
Vehicle {{object.name}} has finished the {{body.route.name}} route.Vehicle {{object.name}} has deviated from the path of {{body.route.name}} route.You can check if the vehicle is currently inside or outside the path of the route and incorporate this into your messages with the following:
{% if body.route.is_outside_path %} Outside route path {% else %} Inside route path {% endif %}You can list the route’s checkpoints with the following:
{% if body.route %}
The vehicle is currently on {{body.route.name}} route, it has to visit the following checkpoints:
{% endif %}
{% for checkpoint in body.route.checkpoints %}
    {{checkpoint.name}}
{% endfor %}
Sample Output:
The vehicle is currently on Thursday Evening YMCB20 route, it has to visit the following checkpoints:
Departure
Checkpoint 1
Checkpoint 2
Checkpoint 3
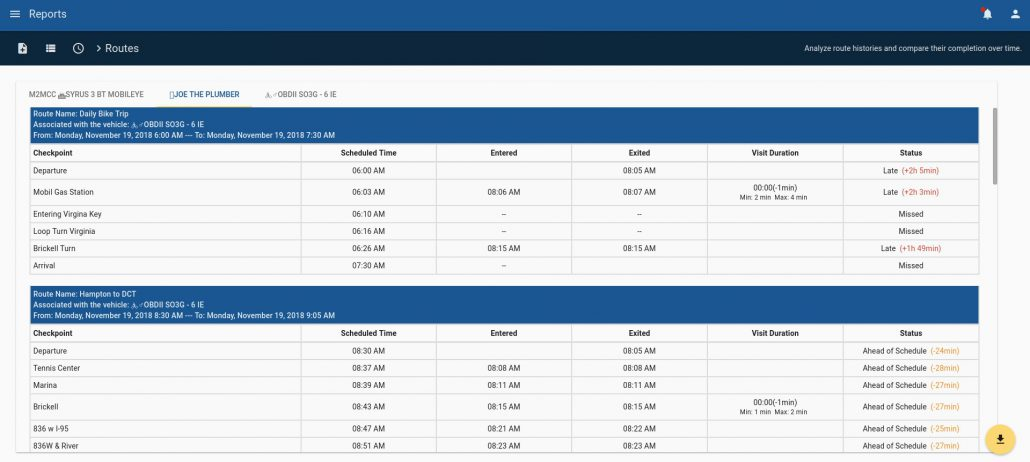
Arrival Routes Reports
The routes report gives you an overview of the route and its completion, whether or not the entity visited the checkpoints, the status of its time, and if it was late by how long.
Updated 8 months ago