Automation / Triggers
The Automation module serves as a platform for creating alerts and notifications tailored to your vehicles. It offers a range of functionalities, from sending basic email alerts when your car reaches home to executing complex actions such as initiating a phone call with a custom message or remotely turning off your vehicle (subject to appropriate installation).
Automation enables the creation of advanced notifications, termed triggers, by combining multiple conditions with corresponding actions.
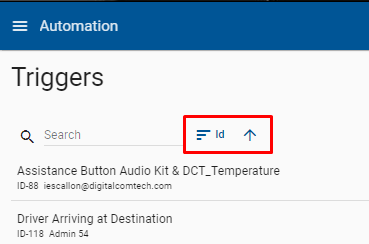
In the main view of the Automation module, all triggers are listed, providing an overview of configured alerts and notifications. Users can conveniently organize this list by either ID or creation date using the button located beside the search bar.
To the right of the triggers, there is a panel providing key information about each trigger:
-
Actions Indicator (1): Indicates the actions associated with the trigger.
-
Assignment Status (2): Displays whether the trigger is assigned to a group, vehicle, or asset.
-
On/Off Status (3): Shows whether the trigger is currently active (on) or inactive (off).
-
Options (4): Offers the ability to copy or delete the trigger.

Creating a Trigger
Creating a trigger involves three main steps:
-
Name Trigger:
-
Select Conditions: Choose the conditions that must be met to trigger the action.
-
Select Entities: Specify the entities, vehicles, or assets to which the trigger will apply.
-
Select Actions: Define the actions the trigger will perform once the conditions are met.
Let's begin by creating a simple trigger to notify when the ignition of our vehicle is turned ON and send an email notification.
-
Name the Trigger: Navigate to the Automation module. Click on the top right icon to create a new trigger. Provide a descriptive name for your trigger when prompted.
-
Select the Conditions: Click on the "+ ADD CONDITION" button to add conditions. A dialog will appear where you can choose from several predefined conditions. For example, select the condition "Ignition turns ON" from the list.
-
Select the Entities: Click on the "Entities" tab. Choose the entities (either from the Groups, Vehicles, or Assets tab) that you want to apply the trigger to. Click on the vehicles that you want to monitor with this notification. You can select multiple groups, vehicles, or assets as needed.
-
Select the Actions to Perform:
Now, let's select the actions to perform when the ignition is turned ON for any of the vehicles we selected. Here are the available actions:-
Alerts: These are alerts that appear as popups on the gateway. They can be browsed later in the Alerts app.
-
Email: This action sends an email notification to the specified email addresses.
-
Safe Immobilization: This action activates the safe immobilization feature of your vehicle if it's installed.
-
Output Management: This action activates or deactivates the device's outputs.
-
SMS & Voice Calls: This action sends an SMS text message or places a phone call to the specified destination number. Note that this feature may require a subscription service.
-
External Integrations: This action sends an HTTP request to an external API.
Please select the appropriate action(s) based on your requirements.
-
Conditions
Hours of Service (HoS)
The Hours of Service conditions are generated after setting up your devices with the proper Maximum Work and Minimum Rest Times.

The possible conditions for either assets or vehicles are:
Started working: when the entity begins its working segment.
Is working: if the entity is working.
Cycle violation: fires one time when the entity exceeds the maximum working.
Cycle exceed: fires if the entity continues exceeding the maximum work time.
Continuous working violation: fires one time when the entity exceeds the continuous working time.
Continuous working time exceeded: fires if the entity continues exceeding the maximum continuous working time.
Started resting: fires when the entity begins to rest.
Is resting: fires if the entity is resting.
Convoys
Proximity Conditions are a Premium Feature
The proximity alerts are part of a premium feature, in order to enable it for your instance please contact a Site Administrator for more information.
This feature allows you to create alerts when two vehicles are close.
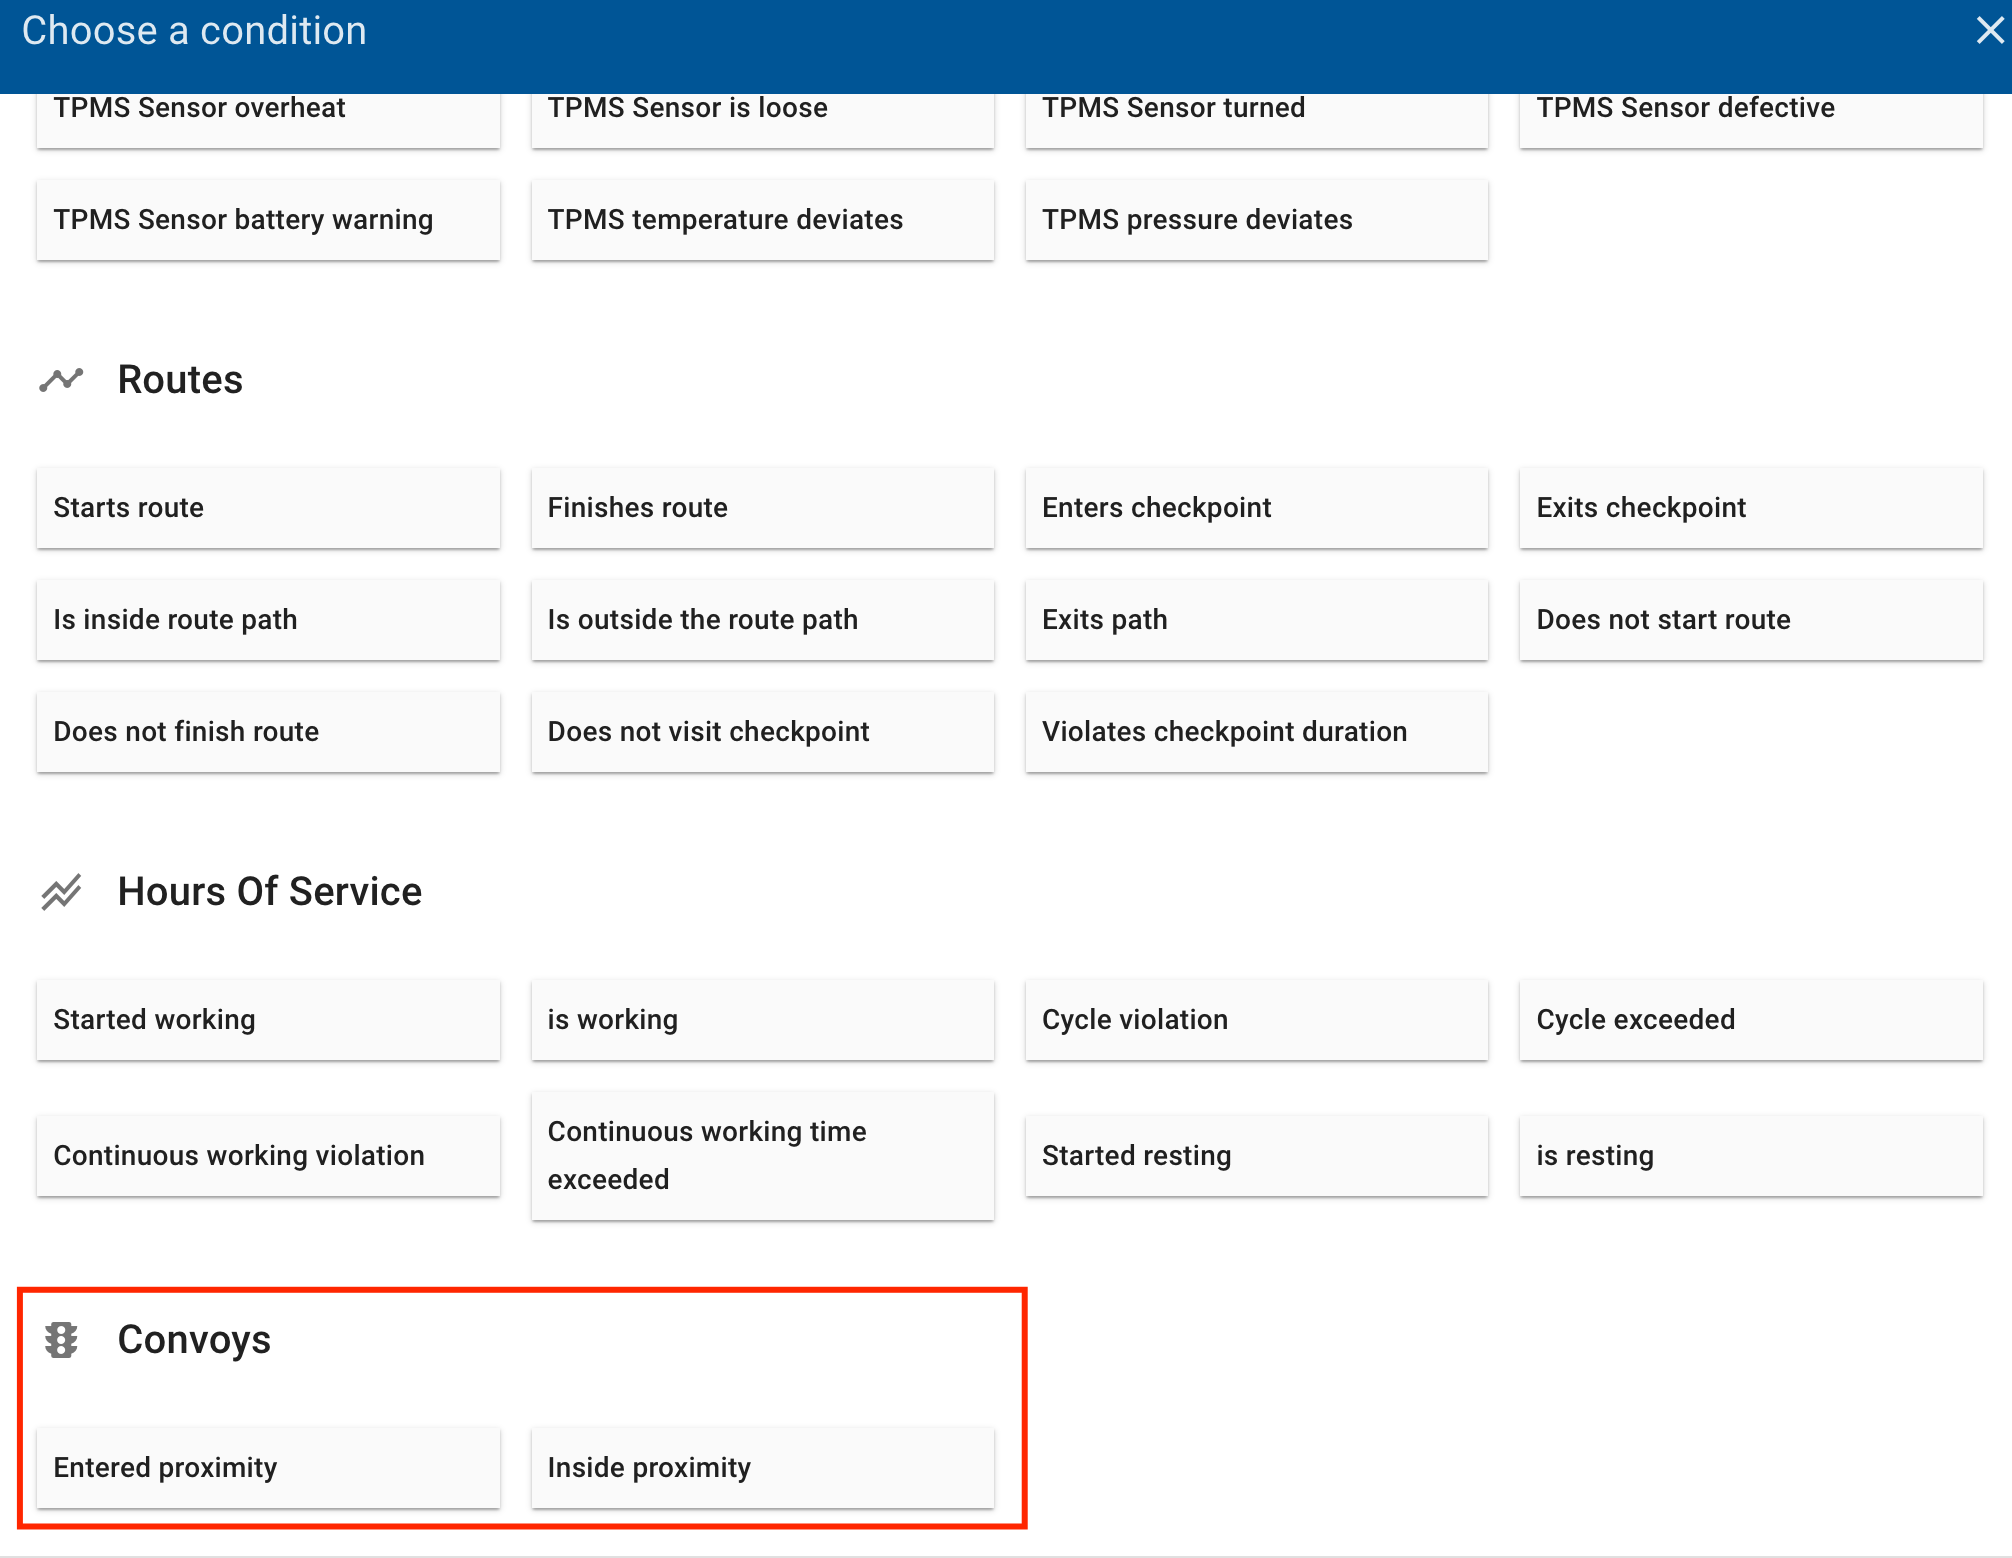
The possible conditions for proximity are:
- Inside proximity: fire if the vehicle continues too close to the other.
- Entered proximity: fire on time when two entities are close.
The trigger rule for proximity should be events must meet all, example:
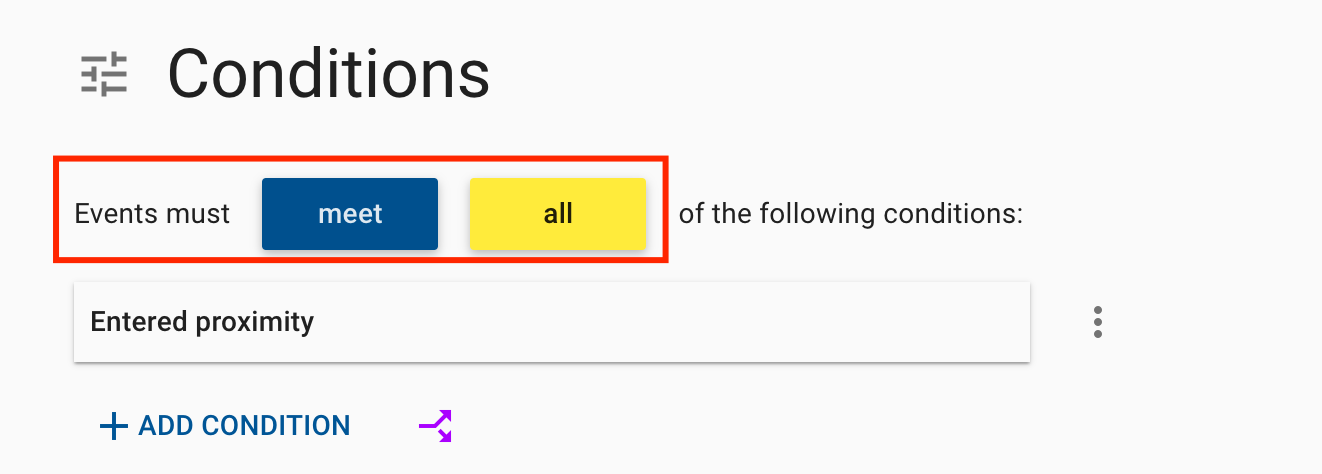
To fire the trigger, the following must be met:
- Vehicles with speed >= 3mph
- Distance between vehicles if vehicle 1 is going x mph
- x= 10 mph -> 268 m
- x= 30 mph -> 805 m
- x= 45 mph -> 1207 m
- x= 75 mph -> 2012 m
Approximate examples of what the cone of the vehicle behind would be like depending on its speed.

- Time difference between GPS reports
- The same direction between vehicles.
- Heading threshold of 90°, that is, if v1 0°, v2 will be considered if 270° <= h2 <= 90°
- 3 Positions in a row meeting the three previous conditions.
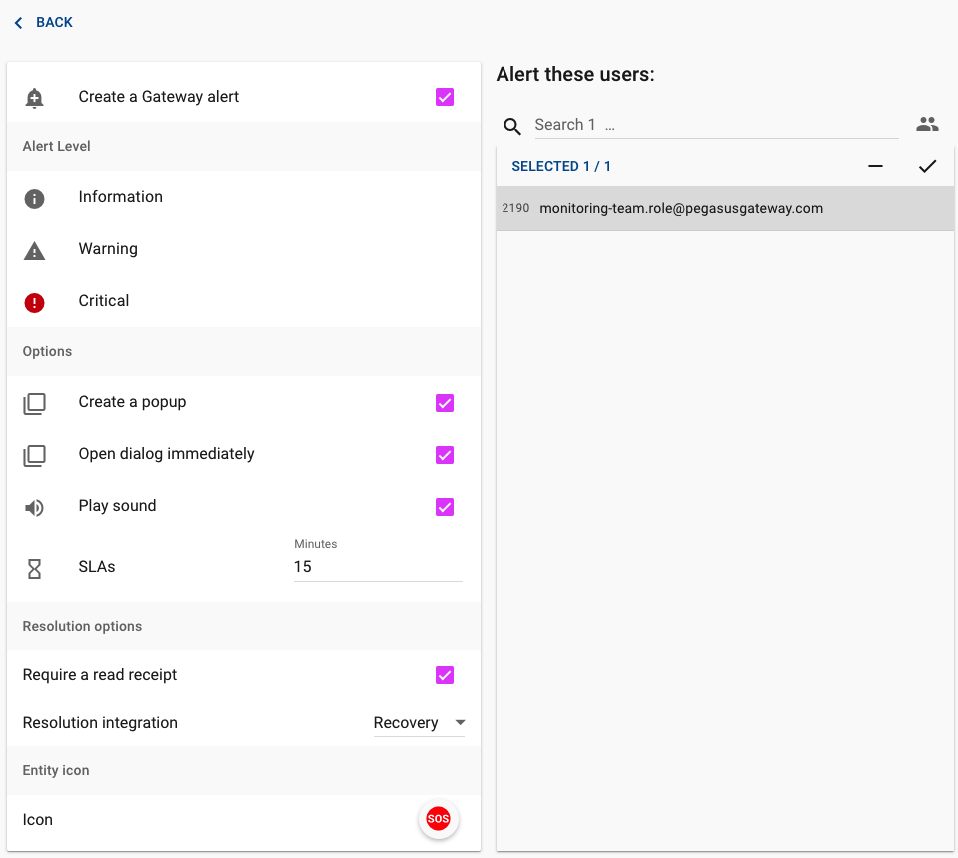
Action: Alerts & SLAs
Alerts are the gateway or platform alerts that fire directly inside the application. They are visualized in the Alerts & Notices section and there's an Alerts Report for them.
When you create an Alert you can
- Give it a level - Whether info, warning, or critical. This is to help you classify the alerts based on the severity of the incident
- Alert users or roles - you can select to alert a single user, or a role of users. With the role you'll notify all users that belong to that role
- Series of options such as:
- Create a popup - this will create a notification inside of the platform and pin it to the toolbar for visibility in any section or application. It will also create an alert inside of your computer if you allow notifications for the page
- Open the dialog immediately - which will show the users or roles that receive the alert, the alert dialog automatically without them having to click on the notification
- Play sound - which will play a system sound to notify the users that received the alert
- Service Level Agreement (SLA) - define the expected response times for different types of alerts. You provide a time in minutes which you would like the alert to be resolved in. If it's not resolved in that time a status will appear in front of the alert that says it's delayed.
- SLAs can be used:
- Alerts And Notices: Users will see the SLA status and response times for each alert, they will see a new status "DELAYED" if the SLA is violated
- Reporting: SLA performance can be tracked with the Alerts report, providing info into how well response times are being met for your alerts
- SLAs can be used:
- And a series of resolution options such as:
- Require a read receipt - which means that the user that receives the alert will have to click a button that they 'read' the message before resolving it. This is helpful when multiple users receive the alert and you want to know which one is working on which before they resolve it.
- Resolution Integration - here is a list of integration options with specific services for notifying of alert status. Contact your administrator for more information.
- recovery - in this case, the alert will show two resolution options: recovered and not recovered.
- default - this is a normal operation to resolve the alert.
- Assign an icon - assign an icon with a color for the vehicles or assets that fire this alert. This icon will be reflected in the tracking page on the map while the alert is unresolved. Once the alert is resolved the icon will go back to the vehicle's default.
The function of the "entity icon" action is to change the icon and/or the icon color of a vehicle in the Tracking module when the trigger is fired.
The icon returns to normal when the alert is resolved in the Alerts app.
Action: Email Event
To configure an email action event:
-
Press the back button to return to the list of actions.
-
Click on "CONFIGURE" next to the email action.
-
Click on the input field, which will display a dropdown of users in your group. Alternatively, you can manually enter any email address you want to notify.
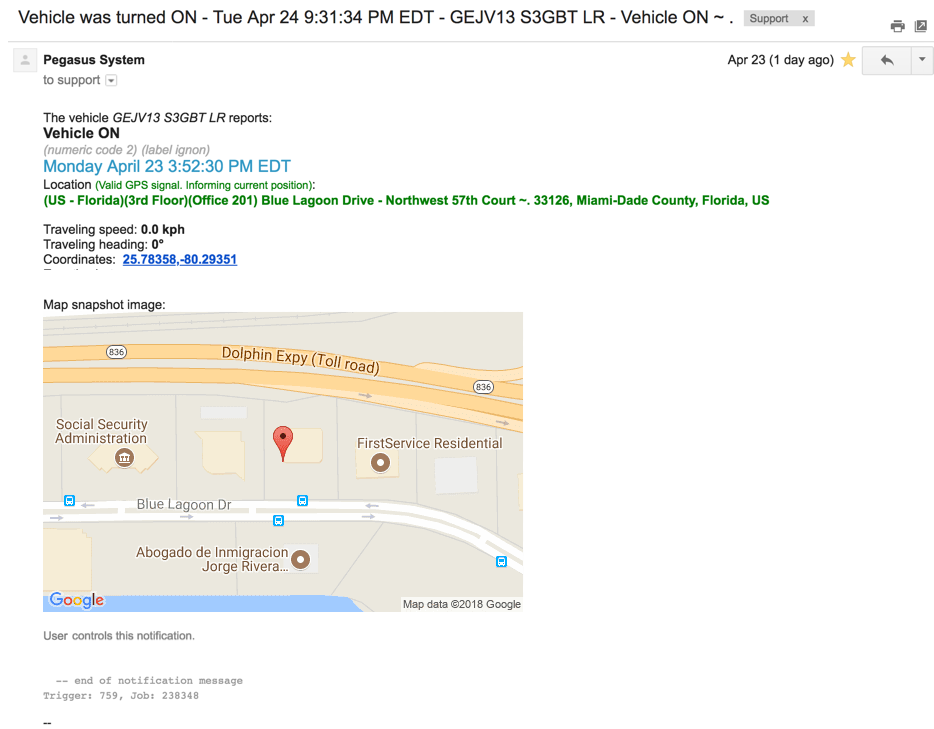
Sample Email
The email that the system generates will automatically contain the following information:
Subject: [Name of the Trigger] - [Time Generated] - [Entity Name] - [Event Triggered] - [Geofence Entered or Exited (this depends on the trigger conditions that fired)]
-
Vehicle Name: [Vehicle Name]
-
Event: [Event]
-
Time and Date: [Time and Date]
-
Location: [Address of the Place]
-
Traveling speed (GPS): [Speed_GPS]
-
Traveling speed (Engine): [Speed_Engine]
-
Heading: [Heading]
-
Coordinates: [Coordinates]
-
Image or Video: [JPG]
- If the event generated includes an image it will be shown, if it's a video then a link to view the video will be provided.
Attached: Map Snapshot of the Location
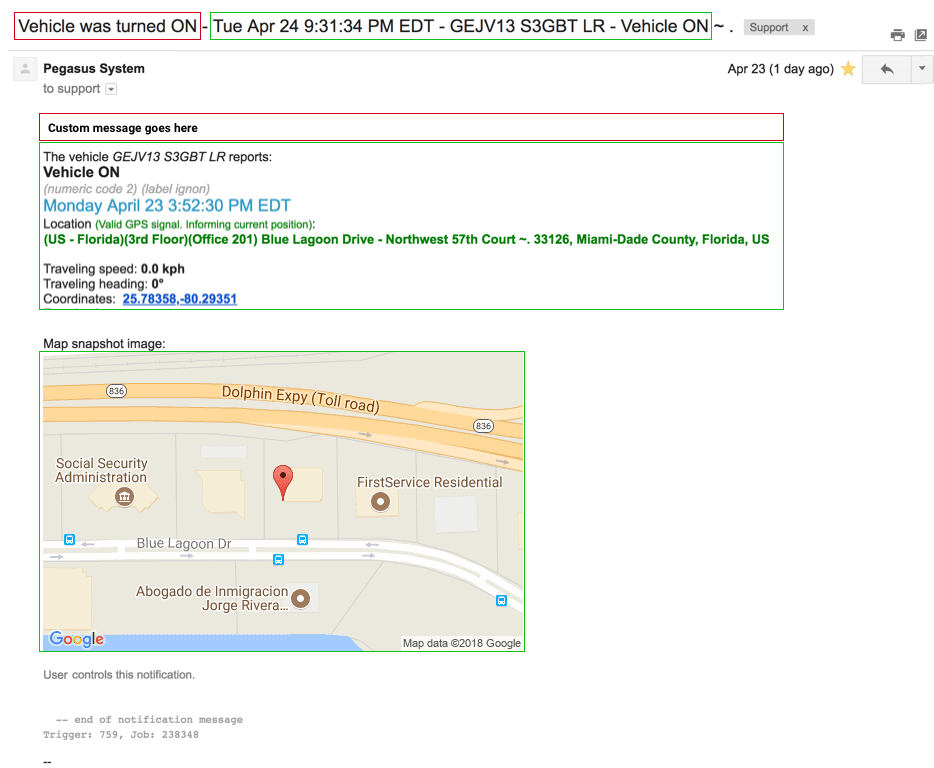
You can add a custom message to the email (red box below) by going back to the Conditions tab, and going down to the “Default Message” section. Then write your custom message.
It will appear inside the email you send, and on the alert that’s generated inside the gateway. Note the red area, which are the customizable sections of the alert.

Action: Safe Immobilization
In the actions section, you have the option to configure safe immobilization by pressing the configuration button. Then, you can select whether to activate or deactivate it. It's important to note that safe immobilization requires professional installation of the device's output cable to a relay inside the vehicle.
Action: Output Management
Similar to safe immobilization, in this section, you can manage any of the Syrus outputs. For example, you can activate output 2 and deactivate extended output 1.
Action: SMS
Optional SMS Plan
If your SIMs don't support SMS you can purchase a virtual number from us and send SMS messages that way. Contact your account representative for more information
You can configure Pegasus to send personalized SMS messages to assigned numbers.
The "send from device" option allows you to send an SMS from the SIM card that the Syrus device is using. (Note: The SIM card must have the capability to send SMS messages.)

Action: Voice Call
Optional Voice Plan
If your SIMs don't support Voice calling you can purchase a virtual number from us and make phone calls that way. Contact your account representative for more information
You can configure Pegasus to call the numbers you assign with a personalized message. Calls are configured with:
- To: Call recipient
- Language: Language that will be spoken by the caller
- Gender: Gender of the person who will make the call
- Loop: Number of times the message will be repeated
- Dialog: Personalized message
Action: External Integrations
You can send an HTTP request to an external API or even consume the same Pegasus APIs.
The following example uses the Pegasus API – it uses $pegasus_api which is a shortcode used to replace the base_url of the API – thus we can use: $pegasus_api/vehicles/{{object.id}}/plugins/photocam/ to tell Syrus to take a photo. (camera accessory required). Note that object.id refers to the ID of the entity that generated the trigger.
Tip: you can use the /event-photos api to add a photo to an external resource request, note that you’ll want to add a countdown of at least 1 minute to allow time for the photo to upload.

Options
The trigger options are used to have more control over the trigger, it allows you to set a limit for how many times it should fire, or create a timed countdown till the actions are fired.
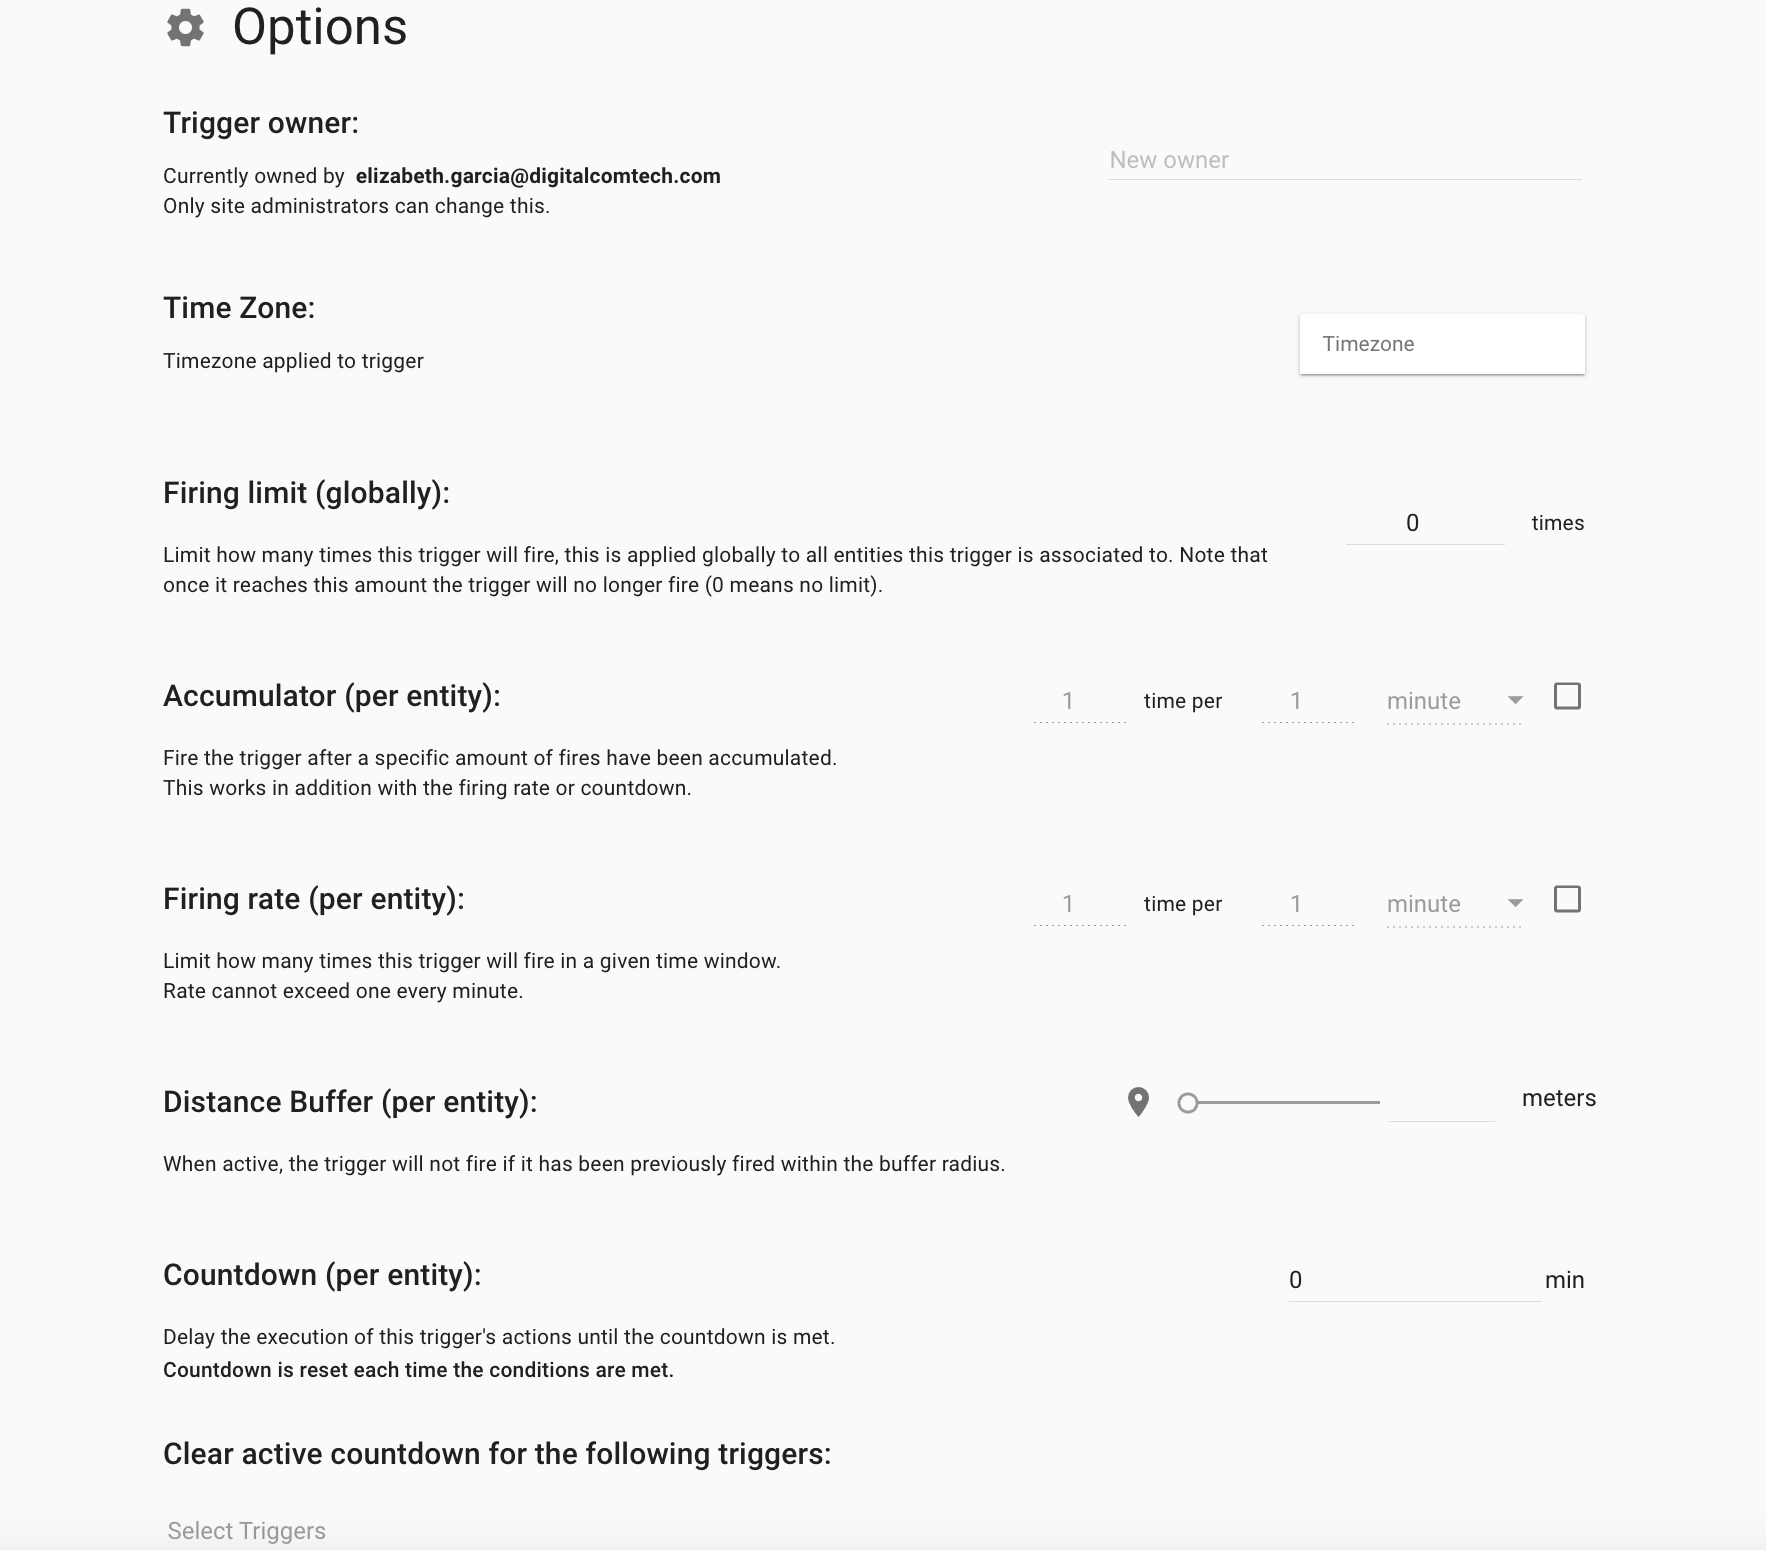
- Trigger Owner: The Owner option allows you to change the owner of the triggers. When modifying this trigger owner, all associations (vehicles, assets, groups, etc.) will be updated to reflect the access of the new owner.
- Time zone: The Time zone option is used when sending a date/timestamp in a trigger message. For example, the time that appears in the email is controlled by this Time Zone option. By default, it is set to the timezone of your computer browser.
- Firing limit: The Firing limit is used to limit the number of times the trigger will fire. Once the trigger has fired the specified number of times, it will stop generating actions. Please note that a change in the trigger’s conditions or turning it off and back on resets this firing limit. Also, note that when the limit is reached, the trigger will stay active.
- Accumulator: The accumulator causes the trigger to fire after a specific number of times it has met the conditions to fire. For example 5 times in 1 hour means that it will fire after it has accumulated five fires within the hour, any fire within the hour after that goes through and is generated normally. On the next hour the accumulator resets.
- Firing rate: The Firing rate is a limit of how many times the trigger will fire in a given time window. This is useful to avoid receiving repeated triggers within a certain time frame. This works with time windows, meaning it's periods of times and the trigger will monitor how many times it fires within that period of time. For example, if the firing rate is set to "3 times per 2 hours," 2-hour time windows are generated, (00:00 - 01:59, 02:00 - 03:59, 04:00 - etc...) where the trigger can fire up to 3 times within that period of time. If the trigger conditions are met more than 3 times in less than 2 hours then it will ignore future fires until the next time window starts. This applies per entity, so if you select multiple entities, each one will have its own firing rate limit.

+------------------+----------------+------------------------+
|   Time Window    | Time Attempted |   Outcome / Count (#)  |
+------------------+----------------+------------------------+
| 00:00 - 01:59    | 00:30          | Fired (#1)             |
|                  | 00:50          | Fired (#2)             |
|                  | 01:50          | Fired (#3)             |
|                  | 01:55          | Ignored (limit met)    |
+------------------+----------------+------------------------+
| 02:00 - 03:59    | 02:10          | Fired (#1)             |
|                  | 02:20          | Fired (#2)             |
|                  | 03:10          | Fired (#3)             |
|                  | 03:15          | Ignored (limit met)    |
+------------------+----------------+------------------------+

Note that the trigger fired at 01:50 and 02:10, even though they are only 20 min apart they are in different time windows.
-
Distance Buffer: When Distance Buffer is enabled, a trigger will not fire again unless the entity has moved beyond a specified distance from the location of its previous trigger. In other words, if a trigger fires at a certain point and the vehicle remains within the buffer distance, future triggers are suppressed.
Example
- You set a 375-meter distance buffer on a trigger.
- The trigger fires at a specific location.
- If the vehicle meets the trigger conditions again but is still within 375 meters of that original location, the trigger will not fire a second time.
- Once the vehicle travels beyond 375 meters from where it last triggered, the next time conditions are met, the trigger will fire again.
- Because this buffer resets per entity, it ensures you don’t get repeated triggers for an entity that hasn’t moved.
-

Countdown: The countdown is a delay in the firing of the trigger’s actions. It is recommended to use this feature with the “Clear active countdown for the following triggers” option. Here’s an example to illustrate its usage:
Suppose we want to receive a notification when a vehicle spends more than 20 minutes inside a specific geofence with the ignition ON.
To achieve this, we create a trigger with the condition: Ignition is ON AND Is inside a geofence, and we set a countdown of 20 minutes.
When this condition is met, the countdown begins.

Then we create a new trigger to get rid of, or clear this 20 minute countdown, the conditions for this new trigger can be whenever the Ignition is turned OFF OR Is outside a geofence.

Thus we would have a trigger that fires a notification after 20 minutes of detecting that the vehicle is inside of a zone with the ignition ON.
Updated 7 months ago